
Target’s technologists are encouraged to take advantage of “50 Days of Learning,” a program that enables engineers to spend time exploring new technologies or learning new languages and systems. I wanted to learn more about developing my own extensions and used some of my learning time to dive into the issue.
I wrote this post in the spirit of learning – in the hope that it helps others who are interested in creating their own extensions by sharing how our team builds them to get more out of the popular development environment JupyterLab.1 This is just one example of how we develop our own tools using open source as a foundation for our work.
Before diving into a tutorial on how to install and use your own instance of JupyterLab, let’s level-set on what JupyterLab is, how it is used at Target, and why it’s important for data analysts and data scientists alike.
What Is Jupyterlab and How Do We Use It?
“JupyterLab” is a popular open source, web-based integrated development environment (IDE), that enables users to work with many different languages and filetypes, including Jupyter notebooks, which combine executable code and rich text outputs [1, 2].
At Target, we host our own instance of JupyterLab to help with our analysis and exploration of data. The sheer amount of data available at Target makes it necessary to look for ways to streamline processes as much as possible and automate as much as we can to allow for scale.
To enrich and ease the process for our analysts, we've built and customized extensions to allow sharing of notebooks with others, scheduling notebooks for automatic and recurring execution, and providing pre-built code snippets. These improvements allow analysts to free up their time to look into more complex issues and data sets. We are proud of the progress we have made in making JupyterLab align with our analysts' needs.
Why Are Extensions Important?
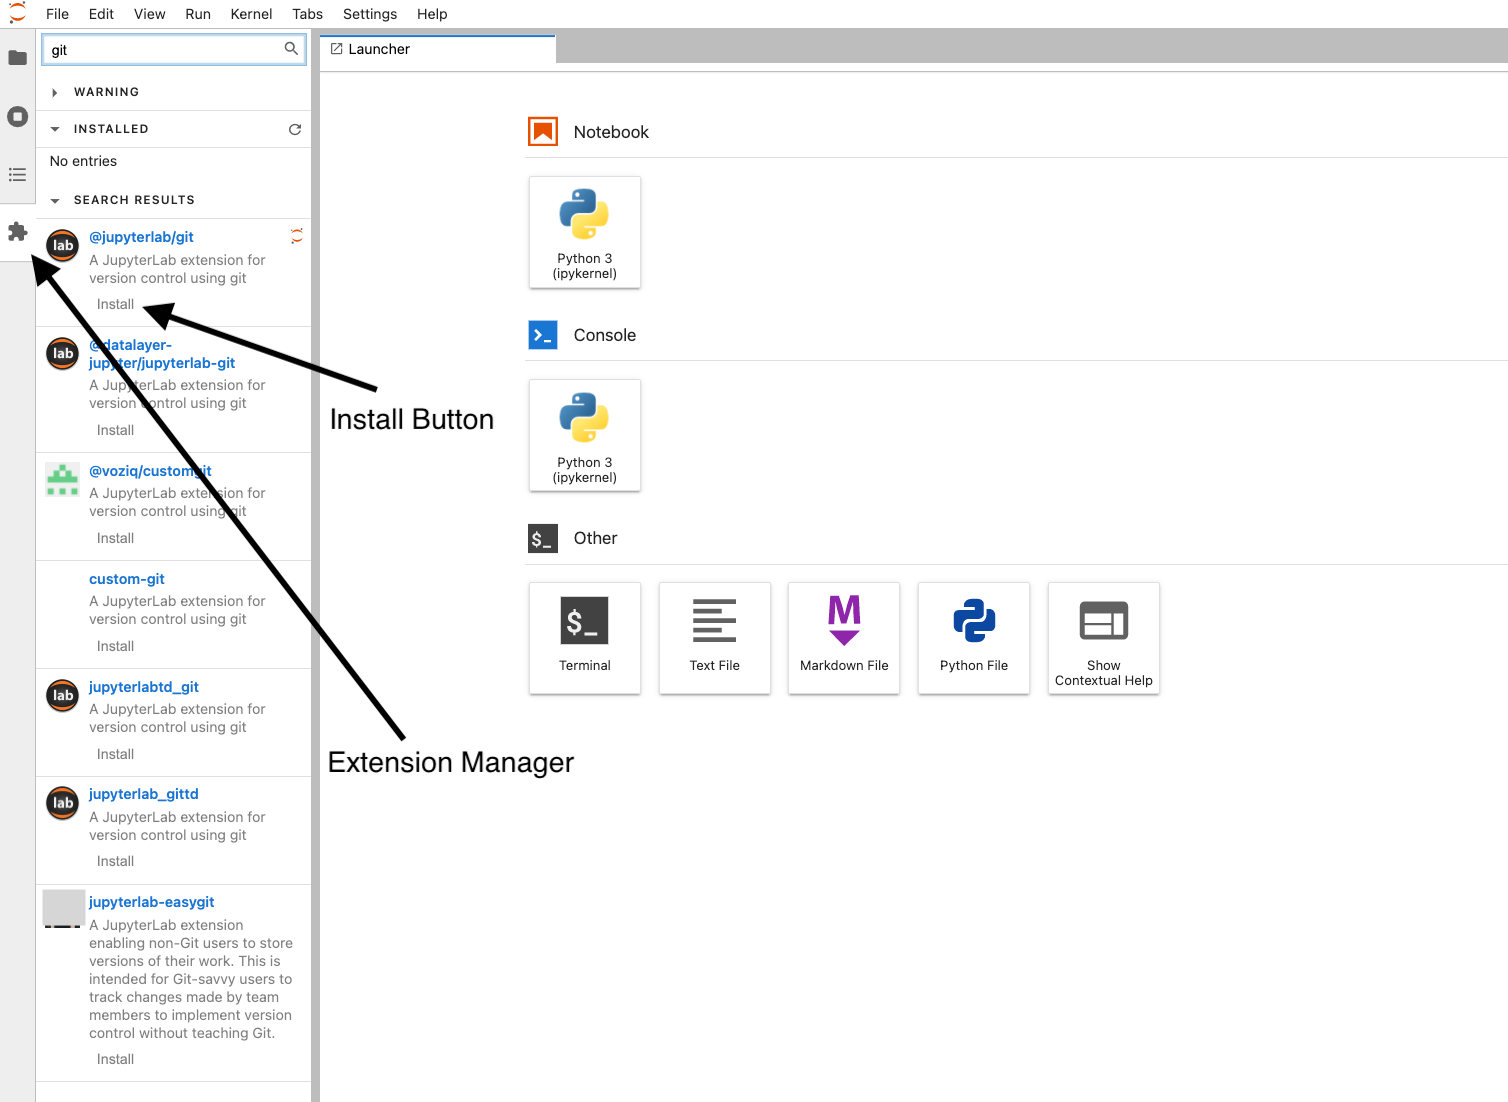
JupyterLab offers excellent features out of the box, but it is also designed to be an extensible environment. Extensions are add-ons built by Jupyter with a majority built through community contributions. A good example of a commonly used extension is the JupyterLab-Git extension. Let's say you want Git integration in JupyterLab. All you have to do is click on the puzzle piece on the left side toolbar, search for Git, and install one of the extensions. If you don't see the puzzle piece, you can press control + shift + c and click on 'Enable Extension Manager' to add it to the tool bar.
As we worked with our instance of JupyterLab, it quickly became clear that we could build our own extensions to make the environment work even better for our teams. We saw such great responses from our teams on time savings and ease of use, that we want to share a tutorial to help you install your own instance and build your own extensions to help automate and streamline your team’s analysis. Here’s how to get started.
How to Install JupyterLab2
Before you get started, ensure you have Python3, NodeJS, and Typescript installed, so you’ll have everything you need to begin developing an extension. To install JupyterLab, run the following command in a terminal:
pip install jupyterlabpip install cookiecutterjupyter labThis will open a new instance of JupyterLab on your default web browser.
Building the Extension
Extensions are powerful as they allow customization and personalization of the IDE to your users’ needs. A popular extension we've built at Target is “Snippets.” Snippets is a common extension that can be installed into JupyterLab, but also a great first extension to develop. The example I share below will give an overview of the steps needed to start from scratch by installing all the dev tools, building extensions, working with menus, interacting with files, all the way through to publishing an extension.
Setup
First, we use cookiecutter to get a quick project structure. To do so, run:
cookiecutter https://github.com/jupyterlab/extension-cookiecutter-tsCookiecutter will prompt you for a few fields of information. Pick the frontend option and fill the remaining fields out as follows:
author_name []: Your Nameauthor_email []: Your Emaillabextension_name [myextension]: snippetsexamplepython_name [myexample]: snippetsexampleproject_short_description [A JupyterLab extension.]: A snippets extensionshas_settings [n]: nhas_server_extension [n]: nhas_binder [n]: nrepository [https://github.com/github_username/myexample]: GITHUB REPOSITORYNow you should have a directory named snippetsexample and inside that should be a bunch of files for a Typescript project.
Imports
Inside of src/index.ts add these lines after the first import:
import { ICommandPalette } from '@jupyterlab/apputils';import { INotebookTracker, NotebookActions } from '@jupyterlab/notebook';import { IMainMenu } from '@jupyterlab/mainmenu';import { Menu } from '@lumino/widgets';Then run the following lines of code in your terminal:
jlpm add @jupyterlab/notebookjlpm add @jupyterlab/mainmenujlpm add @lumino/widgetsjlpmjlpm buildThe jlpm command is JupyterLab's specific version of yarn [3]. The package @jupyterlab/apputils will allow us to interact with the DOM (Document Object Model) and is used by other packages [4]. @jupyterlab/notebook lets us interact with Jupyter Notebooks [5], @jupyterlab/mainmenu allows us to interact with the menu bar in the IDE [6], and @lumino/widgets provides a lot of different Typescript widgets for JupyterLab [7]. The Menu widget will make it easier for us to create a menu.
After the line autoStart: true, add requires: [ICommandPalette, INotebookTracker, IMainMenu], on a new line. The requires parameter lets Jupyter know that the object is needed. This object gets passed to the extension on start up in the next line when you call activate [8].
After app: JupyterFrontEnd add, palette: ICommandPalette, tracker: INotebookTracker, mainMenu: IMainMenu to pass these parameters into our extension.
Commands
After the console.log('JupyterLab extension snippetsexample is activated!') line add the following lines of code:
const { commands } = app; commands.addCommand('openLink', { label: 'Documentation', caption: 'Documentation', execute: () => { const win = window.open('https://jupyterlab.readthedocs.io/en/stable/', '_blank'); win?.focus(); } }); commands.addCommand('printHelloWorld', { label: 'Hello World!', caption: 'Hello World!', execute: () => { const current = tracker.currentWidget; const notebook = current!.content; NotebookActions.insertBelow(notebook); const activeCell = notebook.activeCell; activeCell!.model.value.text = 'print("Hello World!")'; } }); commands.addCommand('printTest', { label: 'Test', caption: 'Test', execute: () => { const current = tracker.currentWidget; const notebook = current!.content; NotebookActions.insertBelow(notebook); const activeCell = notebook.activeCell; activeCell!.model.value.text = 'print("Test")'; }});Commands are just executable objects that we can tie to different widgets. In the code above, we are creating three different commands. When triggered, the first command will open a new tab on your browser to the JupyterLab documentation. The other two commands will add a new code cell in a Jupyter notebook with print statements. The code is essentially grabbing the current active notebook and which code cell the user is on, then creating a new cell below the current one and injecting the print statement into it. When we use these to create the menu, the label parameter will become the text you see on the menu widget. Additionally, the first parameter when using addCommand() will be the command name. This value must be unique with all commands.
Menus
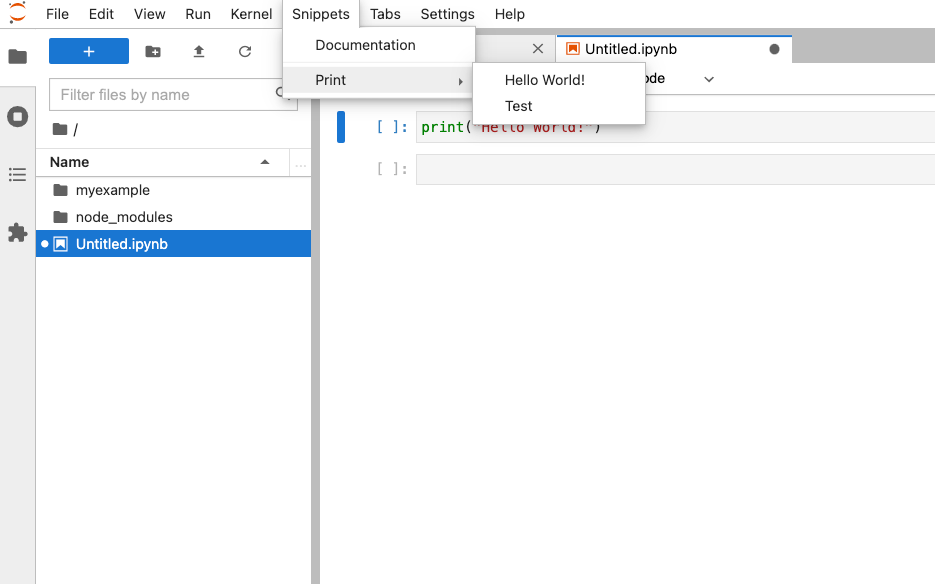
Under the commands added, paste this code:
const snippetMenu = new Menu({ commands }); snippetMenu.title.label = 'Snippets'; snippetMenu.addItem({command: 'openLink' }); snippetMenu.addItem({ type: 'separator' }); const printSubMenu = new Menu({ commands }); printSubMenu.title.label = 'Print'; printSubMenu.addItem({ command: 'printHelloWorld' }); printSubMenu.addItem({ command: 'printTest' }); snippetMenu.addItem({ type: 'submenu', submenu: printSubMenu}); mainMenu.addMenu(snippetMenu);This code creates the menu and adds it to the menu bar in JupyterLab. To create a new menu, you must create the Menu object and pass through all the commands you’re using. There are three things you can add to a menu using the addItem( ) function: command, submenu, or separator. Adding a command will create an item under the menu that acts like a button. A submenu allows you to nest another menu object in a menu. The separator type just adds a divider in the menu.
Local Testing
To test the extension locally, go to your JupyterLab tab. Open a terminal in JupyterLab and from your extension directory run the following commands to build the extension:
jupyter labextension install . jlpm build jupyter lab buildAfter running those commands refresh your tab and you should see a menu item named 'Snippets.'
Note: if one of those build commands failed, you may have to run pip install -ve . to set everything up.
Another nice command to use is jupyter labextension list which will list all installed extensions and their versions.
Publishing
Publishing your extension is the same as publishing a node package manager (npm). The only difference is to use jlpm. The command to publish would be jlpm publish. Once it is in the npm registry you will be able to use the extension manager in JupyterLab.
Summary
You should've now successfully created a JupyterLab extension. What we have built is only a small example of what is possible with extensions. With more time and resources, extensions can significantly improve the user experience of JupyterLab. Now, with some foundational knowledge, a good place to continue learning about building extensions is the JupyterLab Extension Git Repo. We have shared the full code below in hopes that it will help you as you build your own extensions.
Full Code
import { JupyterFrontEnd, JupyterFrontEndPlugin } from '@jupyterlab/application'; import { ICommandPalette } from '@jupyterlab/apputils';import { INotebookTracker, NotebookActions } from '@jupyterlab/notebook';import { IMainMenu } from '@jupyterlab/mainmenu';import { Menu } from '@lumino/widgets'; /** * Initialization data for the snippetsexample extension. */const plugin: JupyterFrontEndPlugin<void> = { id: 'snippetsexample:plugin', autoStart: true, requires: [ICommandPalette, INotebookTracker, IMainMenu], activate: (app: JupyterFrontEnd, palette: ICommandPalette, tracker: INotebookTracker, mainMenu: IMainMenu) => { console.log('JupyterLab extension myexample is activated!'); const { commands } = app; commands.addCommand('openLink', { label: 'Documentation', caption: 'Documentation', execute: () => { const win = window.open('https://jupyterlab.readthedocs.io/en/stable/', '_blank'); win?.focus(); } }); commands.addCommand('printHelloWorld', { label: 'Hello World!', caption: 'Hello World!', execute: () => { const current = tracker.currentWidget; const notebook = current!.content; NotebookActions.insertBelow(notebook); const activeCell = notebook.activeCell; activeCell!.model.value.text = 'print("Hello World!")'; } }); commands.addCommand('printTest', { label: 'Test', caption: 'Test', execute: () => { const current = tracker.currentWidget; const notebook = current!.content; NotebookActions.insertBelow(notebook); const activeCell = notebook.activeCell; activeCell!.model.value.text = 'print("Test")'; } }); const snippetMenu = new Menu({ commands }); snippetMenu.title.label = 'Snippets'; snippetMenu.addItem({command: 'openLink' }); const printSubMenu = new Menu({ commands }); printSubMenu.title.label = 'Print'; printSubMenu.addItem({ command: 'printHelloWorld' }); printSubMenu.addItem({ command: 'printTest' }); snippetMenu.addItem({ type: 'submenu', submenu: printSubMenu}); mainMenu.addMenu(snippetMenu, {rank: 300}); }}; export default plugin;1 “Jupyter” and the Jupyter logos are trademarks or registered trademarks of NumFOCUS, used by Target with permission.
2 THE CODE SNIPPETS REPRODUCED IN THIS POST ARE PROVIDED "AS IS", WITHOUT WARRANTY OF ANY KIND, EXPRESS OR IMPLIED, INCLUDING BUT NOT LIMITED TO THE WARRANTIES OF MERCHANTABILITY, FITNESS FOR A PARTICULAR PURPOSE AND NONINFRINGEMENT. IN NO EVENT SHALL THE AUTHORS OR COPYRIGHT HOLDERS BE LIABLE FOR ANY CLAIM, DAMAGES OR OTHER LIABILITY, WHETHER IN AN ACTION OF CONTRACT, TORT OR OTHERWISE, ARISING FROM, OUT OF OR IN CONNECTION WITH THE SOFTWARE OR THE USE OR OTHER DEALINGS IN THE SOFTWARE.