
This post is the second in a two-part series about creating a documentation workflow for data scientists and engineers. Click here to read the first post. This is an adaptation of a presentation delivered to conferences including Write the Docs Portland 2020, Ohio Linuxfest OpenLibreFree 2020, and FOSDEM 2021. The presentation source is available at GitHub and recordings are available on YouTube.
Background
As I detail in my previous post, our team in Target’s Data Sciences division worked hard to create a set of requirements for the documentation workflow that was a necessary next step in our development process to ensure continuity on our team. In this post, I share how applying our learnings and our strong collaboration as a team led to a successful execution of our workflow with other teams at Target, and positive feedback from teammates who use it, in the hopes that this will be useful for your teams when you are faced with similar needs.
About Pandoc
Pandoc is a “universal” document converter supporting 33 or more input formats and dozens of output formats. It’s been around since 2008 when version 1.0 was released. Version 2.0 came out in 2017 and the version we were using at the time, version 2.9.x, was released in 2019 with 2.18 being current in April 2022. It’s open source, licensed under the GPL 2.0+. It's written in Haskell but supports Lua for writing filter plugins that process the abstract syntax tree that Pandoc uses as an internal representation of the dozens of document formats it can read and write. There’s also a Python library for writing filters.
Pandoc is widely available for a variety of operating systems in a variety of package managers: Homebrew has it for macOS and Linux, Scoop has it for Windows, and versions of varying age are available in virtually every Linux or BSD distribution’s package repositories. There are also downloadable installers available on https://www.pandoc.org.
Using Pandoc
Invoking Pandoc is very easy:
pandoc document.md -o document.pdfPandoc attempts to figure out the input and output formats based on the filenames, but oftentimes it's better to be explicit.
This is an example output of running Pandoc on an early version of the slides of the presentation version of this post. The presentation is written in Markdown and uses Pandoc to produce the HTML code which comprises the presentation.
A real invocation might look something more like this:
pandoc \ 01_intro.md 02_problem.md 03_diagnosis.md \ 04_remedy.md 05_summary.md \ --output documentation.pdf \ --filter pandoc-crossref \ --filter pandoc-citeproc \ --lua-filter .filters/glossary/pandoc-gls.lua \ --pdf-engine xelatex \ --top-level-division=chapter \ --number-sections \ --toc --toc-depth=3 \ -M lof -M lot \ --bibliography=bibliography.bib \We broke down chapters and sections into separate files. Pandoc effectively concatenates all input files. Note the use of filters and the choice of PDF engine that enables XeLaTeX in order to use Unicode and some other implementation-specific features. Note the choices about table of contents, section numbering, lists of figures and tables, and bibliography.
Metadata and some other options can easily go into a YAML section at the beginning of a document. Pandoc also supports a configuration file containing defaults. I use this in some newer projects to shorten the Makefile.
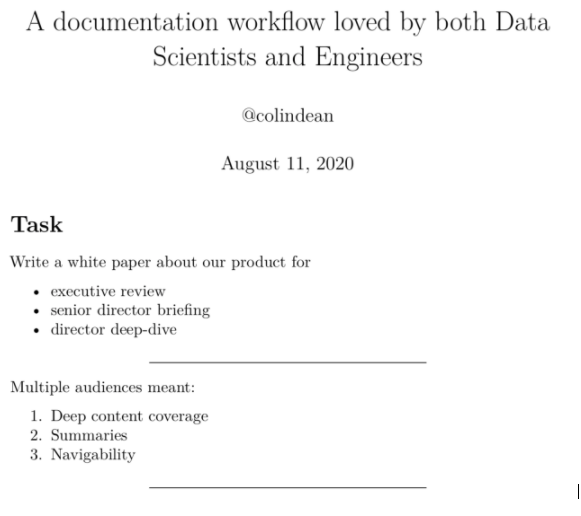
--- title: > A documentation workflow loved by both Data Scientists and Engineers author: '@colindean' date: August 11, 2020 theme: white css: custom.css --- # Task Write a white paper about our product for * executive review * senior director briefing * director deep-diveAs alluded earlier, I built the original presentation version of this post in Markdown and converted it to a Reveal.js presentation using Pandoc. Both Reveal.js and Powerpoint are supported first-class for output, along with some other presentation systems like LaTeX Beamer.
To make it easier to invoke Pandoc, I used a tool called Make with a configuration that looks like this:
PRESENTATION = document_workflow MARKDOWN = $(PRESENTATION).md HTML = $(PRESENTATION).html DEPS_DIR = deps all: $(HTML) %.html: %.md pandoc \ --to=revealjs --standalone \ $< --output=$@ \ -M revealjs-url=$(DEPS_DIR)/reveal.js/reveal.js-3.9.2Any sufficiently advanced build script eventually reimplements Make, so I tend to reach for it first and then script around it when necessary.
Extending Pandoc
Pandoc is powerful by itself but it's easily augmented through its filter plugin ecosystem. Two very commonly used plugins are pandoc-citeproc, used to process citations and bibliographies, and pandoc-crossref, used for cross-referencing figures, equations, sections, code listings, tables, and more.
I’ve also used plugins such as pandoc-include-code, which retrieves code from files at document build time instead of having to copy/paste the code into the input document, pandoc-placetable, which nicely renders data from a CSV file into a tabular format appropriate for the output document format, and panpipe, which can execute code blocks as a part of document rendering so that code examples and their output are always synchronized. Panpipe can even output files as a side effect, so you can include example input and output alongside a workshop PDF!
Plugins are written in Haskell, Lua, Python, and more. I recommend seeking filters in the Lua part of this ecosystem, as they don’t require installing or compiling anything, as other plugin systems may necessitate.
Including Images and Diagramming with Pandoc
Images to be included in the output document can be in a variety of formats. I tend to convert SVG images to PDF and include the PDF version in the Markdown because I know that PDF will look right versus SVG. SVG output from most tools rarely has converted fonts to paths and the fonts may not be available on the rendering platform, like a continuous integration system.
Including an image from a file in a Markdown document is quite easy:
{#fig:diagram width=3in}Here, I redrew a diagram using TikZ, and it looked a whole lot better than the PNG derived from a screenshot of a PDF:
\begin{figure} \centering \tikz{ \draw[->, thick]{ (0,0) -- (10,0) }; \node[circle,radius=2pt,fill=blue] at (0,0){}; \node[circle,radius=2pt,fill=blue] at (1,0){}; \node[circle,radius=2pt,fill=blue] at (2,0){}; \node[circle,radius=2pt,fill=blue, color=blue, align=center, label={[text=blue]Training Data}] at (3,0){}; \node[circle,radius=2pt,fill=blue] at (4,0){}; \node[circle,radius=2pt,fill=blue] at (5,0){}; \node[circle,radius=2pt,fill=blue] at (6,0){}; \node[circle,radius=2pt,fill=blue] at (7,0){}; \node[circle,radius=2pt,fill=red, color=red, align=center, label={[text=red]Test Data}] at (8,0){}; \node[circle,radius=2pt,fill=red] at (9,0){}; \node at (11,0) {time}; } \caption{Splitting time series data into training and test sets. Based on a graphic by Hyndman and Athansopouslos.} \label{fig:timeseries} \end{figure}TiKZ is a powerful LaTeX-based domain-specific language for creating scalable graphics.
Bibliographies et aliae opus citatum
Using the pandoc-citeproc filter, we can easily enable bibliographical references. A Markdown document with the content:
As described in @hendry1995dynamic, we conclude that…When passed --filter pandoc-citeproc --bibliography bib.bib with bib.bib containing:
@book{hendry1995dynamic, title={Dynamic Econometrics}, author={Hendry, D.F. and F, H.D. and Hendry, P.E.O.U.F.D.F. and Oxford University Press}, isbn={9780198283164}, lccn={gb95034438}, series={Advanced texts in econometrics}, url={https://books.google.com/books?id=XcWVN2-2ZqIC}, year={1995}, publisher={Oxford University Press} }will output a nice reference and link to it in the References section at the end of the rendered document.
About Our Workflow
In addition to Pandoc, which converted our Markdown to a PDF file, we used a series of other important tools to collaborate, build, and deliver our document: Git, GitHub, and a continuous integration system.
About Git
We stored the document’s source files in a Git repository. Git is the predominantly used distributed version control system in the software industry. It is free and open source and available for every modern operating system.
Version control systems enable collaborators on a software project to easily manage the flow of changes to software over time and to retain old code as a reference. Git was originally written by Linus Torvalds to manage the Linux kernel, a massive codebase with millions of lines of text.
Git is great for source code, so it is great for word processing, too. For binary files such as images, it is not so great for storage efficiency, but it can handle them. Storing your images as text files in the form of the source code to generate them is ideal!
In the context of this document workflow, the document text, images, and other things that go into the produced PDF file, plus the scripts and configuration to build the PDF, go into a Git repository.
About GitHub
Git’s popularity exploded in the late 2000s because of GitHub, a widely used public website that hosts Git repositories and facilitates collaboration features through a web interface. GitHub, is now owned by Microsoft. GitHub Enterprise is an on-premises version of GitHub increasingly used by large companies, including ours.
We used the collaboration features of GitHub, notably its “pull requests” and “code review” features to submit work for the group to review and offer suggestions to improve.
About Drone and Vela CI
Drone and Vela CI are continuous integration systems that integrate with GitHub. Both are Open Source, and a team at Target leads the Vela project. We started out on Drone and eventually migrated to Vela as it became approved for usage within the company.
When code is submitted for review or when it is accepted — merged — then GitHub tells the CI system to execute a pre-configured series of commands. This generally runs tests on a codebase or packages the software for public release. In our case, we configured it to build and publish our PDF document.
Our Automated Build Workflow
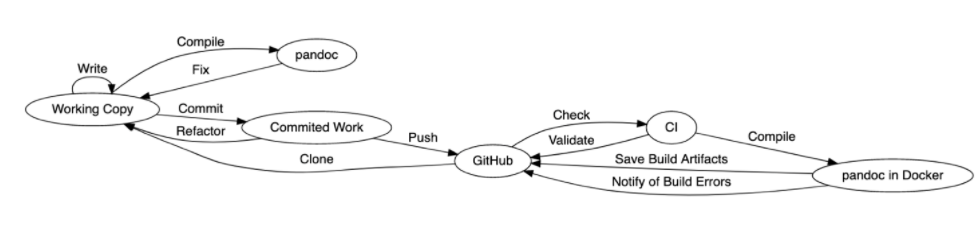
Those of you who are familiar with GitHub will recognize this workflow.
Note how changes move around the system. We clone the repository from GitHub and write in the working copy on our workstations. We use Pandoc to compile the document and preview it to ensure it looks right. When we’re satisfied, we commit the work.
Authoring and Managing Content
Throughout the several projects I’ve built with this workflow, I’ve found that it’s important to keep author tooling simple and rules around what goes into the repository simple, too.
Authors should use a Markdown-specific text editor with preview. PanWriter and MacDown are great. Authors more comfortable with command line tools would find the combination of vim text editor, entr file watcher, and a PDF viewer to be adequate. Editors that enable a “focus mode” that hides the rest of the app are great for maintaining flow.
When composing, writing one sentence per line makes it easier to suggest minor changes to documents during the review process. Pandoc, and the Markdown standard in general, will combine lines into a paragraph when there’s not an empty line between them.
When you limit relevant content to a single file per chapter, you can deftly extract a single chapter or a few into a single PDF. This is great for a summary PDF or for testing only one file in a large document. Our final product, which was approximately 45 pages, took around 12 seconds to compile on my laptop. Compiling with only one chapter takes about two seconds.
When storing files in a version control system repository — Git, etc. — ensure that the changeset or commit messages tell a clear story about the changes in each patch. They should explain why the content was added if it’s not clear or why a figure was changed. This helps teammates understand why a change was made. It’s also helpful to keep a changelog or errata chapter or section of the document that readers can use to understand changes in the document since they last reviewed it. Such can also demonstrate that a document is a living document— that it can change and does.
Reviewing Changes
Reviewing changes through a system such as GitHub’s Pull Requests is ideal. Pull Requests should automatically assign reviewers using the CODEOWNERS file to define who is supposed to review changes to what files. Choose a convention with your team of submitter-merge or reviewer-merge: when the new content looks good, who will push the button to include it? My teams tend to prefer submitter-merge.
When reviewing, discuss suggestions and provide alternative suggestions. Establish consensus on controversial suggestions. Use the features of the reviewing engine instead of taking conversation to private message. Most importantly, though, make progress: don’t quibble endlessly. Get on a conference call and talk something out.
Continuously Integrating
It’s wise to use a continuous integration system with this workflow so that the document is built regularly and for every meaningful change. We’ve used Drone and now Vela at Target, but I’ve also set up this workflow on GitLab’s built-in CI system.
Block PR merging with CI system automation: if the document doesn’t build with the proposed changes, then the patchset’s pull request shouldn’t be mergeable. Other useful tests include markup convention checks, grammar and spelling checks with operating system-provided tools, and employing proselint or another style checking tool.
Every time I've not set up CI on a repo using this template, someone has managed to merge something that breaks the PDF build and it's been difficult to track down. I know what to look for now – XeLaTeX doesn't like Greek letters inside formatting inside equations, which is apparently no longer a necessary practice — but automating checks will save significant time down the line.
Pain Points
This was not without some pain. Some things were easy to fix, others hard, and some are yet unresolved. Setting up a “development” environment on an author’s workstation presented some challenges. Some authors comfortable with command-line tools were quickly on their way but others stumbled a little. We found that this was largely related to installing all of the packages that Pandoc needs to build PDFs, so I automated that, and it was transformed from a task fraught with errors to one filled with coffee: run a single command and go brew something to enjoy for when you return to the completed setup process.
Some authors were frustrated by minute differences between CommonMark-standard Markdown and Pandoc’s Markdown implementation. They are subtle but they enable authors to take advantage of features of LaTeX, PDF, and other systems that Pandoc uses for output beyond what’s found in Markdown that’s normally intended for HTML output only.
Another set of authors expressed a preference to “just use LaTeX” or wanted to convert their Word or LaTeX documents to Markdown. We started to allow this with the stipulation that such an author would own their converted file, but the first time we found that we made changes in a versioned output of such a conversion, we required that the original be included in the repository and the Markdown conversion be simply a build step. Overwriting like this cost us a lot of time.
This is bad:

I recommend avoiding this entirely: store the original document in the repository and the build system must handle the conversion from the original format to something that works with Pandoc.
This is how it should be:

Other Tools
There are a host of other tools that made this process easier.
Growing Adoption
Our leadership was very impressed not only with the nearly 50-page document we produced, but also the system and the collaborative teamwork that went into building both. More than two dozen authors in Target’s Data Sciences division have already used this system to write important papers.
We've since expanded its use to other teams, including one using a fork of my original repo as a basis for documentation spanning several teams. Content is brought in via git submodules, where each repository is also its own document. This document is very much a living document and has grown from around 150 pages at its first “release” to more than 200 pages. Fear not, this is a lot of pages but there are a lot of diagrams and code examples!
At least one person working on a book has inquired about using it. That's awesome, because the basis of my system was what was used to write the first edition of A Friendly Introduction to Software Testing by Bill Laboon. I independently have used a variation of this workflow for a few other projects, individual and group efforts, with great success!
My long-term vision for this is to have a single source for this document system that gets turned into a bunch of easily consumable formats, creating a searchable library of sorts, an internal Arxiv.org for our internal scientific documents. Eventually, I’d like for my “whitepaper template,” as it’s become known, to easily output HTML in a CI workflow suitable to be published as a static website for GitHub Pages. I’d like for it to output ePub for easier consumption on mobiles.
Then, there’s style. Our documents use mostly out of the box Pandoc and LaTeX styles with a few customizations. I'll probably leave Computer Modern as the font because it just conveys a certain air of... respectability.
Every New Beginning Comes from Some Other Beginning’s End: A Brief Tutorial
I would be remiss not to leave an easy template starting point for an interested reader. The aim is for you to make a few small changes suitable for your next documentation project and be on your way to producing a high-quality document meeting the input and output needs of engineers and data scientists alike!
I’ve whittled down this system to nearly a bare minimum, but still some conveniences.
I’m a big fan of Homebrew and a frequent contributor to Homebrew-Bundle, an easy way to install dependencies on macOS and Linux. Installing Pandoc and make is easy with Homebrew, so use this to get started. If you’re on Windows, try scoop , or if you’re on another operating system, look in your package repositories.
Using Homebrew, install these dependencies with brew bundle --file=Brewfile after writing this snippet to a file simply called Brewfile:
brew 'pandoc'brew 'pandoc-crossref'brew 'make'brew 'entr'if OS.mac? puts "Installing macOS packages" cask 'mactex'else if OS.linux? puts "Installing Linux packages" else puts "Unknown Homebrew OS, this might not work..." end brew 'texlive'endYou’ll also need to install a TeX engine suitable for your operating system. On macOS with Homebrew, run brew install mactex. On Linux with Homebrew, run brew install texlive. These will be install via the above Brewfile. Alternatively, install it from your OS package manager. On Debian or Ubuntu or derivatives, you’ll want to install texlive-xetex. On Windows, use WSL or you can try installing things with scoop, e.g. run scoop install latex.
Put the contents of this snippet into a file called Makefile:
# the base part of the file name# change this to suit your needsOUTPUT=documentPDF_OUTPUT=$(OUTPUT).pdf OUTPUTS=$(PDF_OUTPUT) CONFIG=config.yamlMD_FILES=$(sort $(wildcard 0*.md)) LICENSE_MD=LICENSE.mdLICENSE_TEX=$(LICENSE_MD:md=tex)BIBTEX=$(wildcard *.bibtex)GLOSSARY=glossary.tex PANDOC=pandoc SNIPPETS=$(wildcard .snippets/*)FILTERS=$(wildcard .filters/*) WATCHABLES=$(MD_FILES) $(CONFIG) $(LICENSE_TEX) $(BIBTEX) $(SNIPPETS) $(FILTERS) $(DRAFT_PDF_FILE) $(DRAFT_MD_FILE) $(GLOSSARY) # set version if git directory existsifneq ($(wildcard ./.git/*),) VERSION=v$(shell git describe)endif ##@ Buildingall: $(OUTPUTS) ## Build all outputs ##@ Utilityhelp: ## Display this help @awk 'BEGIN {FS = ":.*##"; printf "\nUsage:\n make \033[36m\033[0m\n"} /^[a-zA-Z0-9_-]+:.*?##/ { printf " \033[36m%-15s\033[0m %s\n", $$1, $$2 } /^##@/ { printf "\n\033[1m%s\033[0m\n", substr($$0, 5) } ' $(MAKEFILE_LIST) $(PDF_OUTPUT): $(WATCHABLES) $(PANDOC) \ --defaults $(CONFIG) \ $(MD_FILES) \ --output $@ \ --metadata="date:$(VERSION) built $(shell date '+%B %d, %Y %H:%M:%S %Z')" .PHONY: openopen: $(PDF_OUTPUT) ## Opens the PDF in your PDF reader test -n $(shell which xdg-open) && xdg-open $(PDF_OUTPUT) 2>&1 > /dev/null || open $(PDF_OUTPUT) %.tex: %.md $(PANDOC) --from=markdown+autolink_bare_uris --to=latex $< -o $@ $(LICENSE_MD): ## Create a default LICENSE file @echo Creating a default $(LICENSE_MD) @echo "© $(shell date '+%Y') $(OUTPUT) Authors. All rights reserved." > $@ $(GLOSSARY): ## Create a default (empty) glossary @echo Creating a default $(GLOSSARY) @touch $@ .PHONY: gitaddgitadd: ## Easily add all files we normally care about git add $(WATCHABLES) .PHONY: watchwatch: ## Launch entr to automatically recompile on changes ls $(WATCHABLES) | entr 'make' .PHONY: list-alllist-all: ## List all input and output files @echo "INPUTS: $(WATCHABLES)" @echo "OUTPUT: $(OUTPUTS)" .PHONY: cleanclean: ## Clean build artifacts rm -rf $(OUTPUTS) $(LICENSE_TEX) $(DRAFT_PDF_FILE) # user-specific overrides-include .env.mkcreate-local-env: .env.mk ## Sets up local build env overrides, e.g to use Pandoc in Docker.env.mk: @echo "# uncomment to use a Docker installation of local Pandoc" >> $@ @echo "# PANDOC = docker run --rm --user \"\$$(shell id -u):\$$(shell id -g)\" --volume \"\$$(shell pwd):/pandoc\" dalibo/pandocker:stable" >> $@ todos: ## Find TODOs @/bin/echo -e "\033[1mOutstanding TODOs\033[0m" @grep --line-number --color -R TODO . --exclude=Makefile --exclude-dir=.git --exclude=buildlog.json --exclude=*~Put the contents of this snippet into a file called config.yaml:
---from: markdown+autolink_bare_uris metadata: # document metadata title: "On Stuff & Things" subtitle: "My Copypaste of a Pandoc Template" author: ["Your Name","Your Coauthor"] subject: "The Main Idea" keywords: - another idea - yet another idea thanks: | This is where you can write something to thank people. # crossref filter options codeBlockCaptions: true linkReferences: true nameInLink: true # useful for a document copyright license and a changeloginclude-before-body: ['LICENSE.tex'] variables: # physical paper and layout settings documentclass: report papersize: letter geometry: - margin=1in # list of figures lof: true # list of tables lot: true # table of contents toc: true # Fonts in LaTeX can be hard, I like this one or 'computermodern' fontfamily: 'sourceserifpro' # change the color of text that is linked colorlinks: true # links go in footnotes links-as-notes: true # page stylings pagestyle: headings # Use citeprocciteproc: true# Remove # to enable bibliographic references# bibliography: # - refs.bibtex number-sections: true # This is the LaTeX binary that will be used.# It's generally best to use xelatex by default.pdf-engine: xelatex# An alternative engine with a smaller installation base by default# pdf-engine: tectonic # The filters to use listed in the order they will be processed.filters: - pandoc-crossref # Citeproc is now an option, older versions of Pandoc might need # the filter specified like this. # - pandoc-citeprocpreserve-tabs: trueAnd put some Markdown into a file the name of which must begin with a 0. That’s a convention to indicate what .md files should be included in the document. Use 0000_intro.md as the filename.
# My Document Congratulations, you've created a document! Lorem ipsum dolor sit amet.If you’ve got everything setup correctly, run make all and your document will come out in document.pdf. Run make help to see some other commands available in this Makefile.
We hope that this post and template will be helpful to our readers looking to produce their own high-quality documentation, and that our learnings will help you implement a documentation workflow of your own that’s sure to meet the needs of your teammates and impress your leadership.
RELATED POSTS
Requirements for Creating a Documentation Workflow Loved by Both Data Scientists and Engineers
By Colin Dean, April 6, 2022
This is an adaptation of a presentation delivered to conferences including Write the Docs Portland 2020, Ohio Linuxfest OpenLibreFree 2020, and FOSDEM 2021. The presentation source is available at GitHub and recordings are available on YouTube. This is a two-part post that will share both the requirements and execution of the documentation workflow we built that is now used by many of our teammates and leaders. Read part two here.